Network page
You can change the network settings of the openSPOT3 on this page.
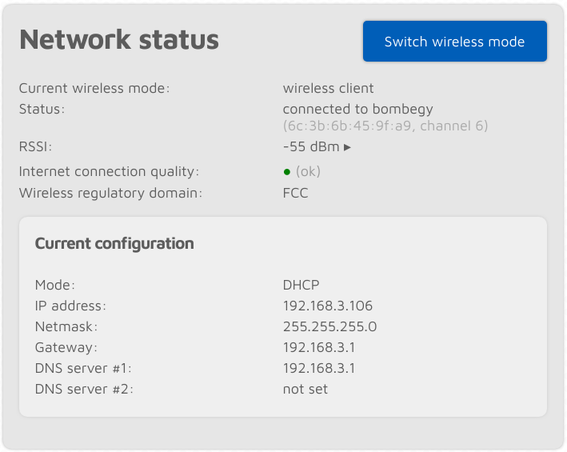
The Network status section shows current network status. The Wi-Fi RSSI graph can be shown by clicking on the little arrow next to the RSSI value. The Internet connection quality is determined by the openSPOT3 by periodically measuring the network latency. You can get the measured latency value by hovering the mouse above the quality display circle. The Wireless regulatory domain is set by the country of operation.
The openSPOT3 can be switched between AP and normal modes by clicking on the Switch wireless mode button. This is the same as pressing the button for 3 seconds.
Network traffic
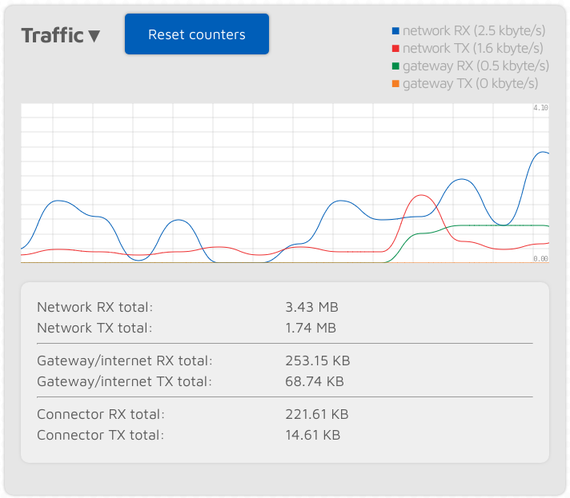
The traffic graph can be shown by clicking on the arrow at the top of the Traffic section. The Network RX/TX total shows total Wi-Fi traffic of the openSPOT3, the Gateway/internet RX/TX total shows the traffic coming/going from/to the gateway (which is usually the internet traffic consumed by the device), and the Connector RX/TX total shows the traffic used by the currently active connector.
The openSPOT3 uses very little internet traffic. Depending on the active connector, the data rate estimates are as follows:
- Quiet channel is 36-180 kB / hour
- Active channel is 3-6 MB / hour
Network settings
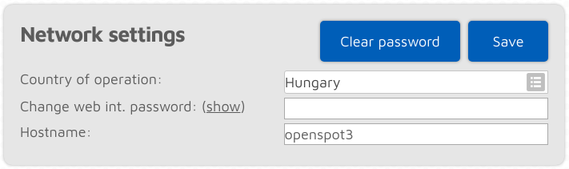
The web interface of the openSPOT3 is not password protected by default, which means anyone on the local network can open it. You can set a password by entering it in the Change web int. password input field. To reset the original behavior and clear the password, click on the Clear password button.
The Hostname is used by openSPOT3's built-in LLMNR and MDNS server which means you'll be able to open the web interface by entering http://hostname/ or http://hostname.local/ into the browser. The hostname is also displayed at the top right corner of the web interface. If you have multiple openSPOT3s on the same network, make sure you use different hostnames for each of them.
The following settings are only available if Advanced mode is enabled.
Please see the About the dejitter queue section of the user manual for more information on the Dejitter queue length setting.
The openSPOT3 checks for internet connection availability and quality periodically. The interval of these checks is set by the Internet conn. check interval setting.
The openSPOT3 can send its log to a syslog server set by the Syslog server field. Check the Send log to syslog server checkbox to enable using the syslog server.
Please see the Powersaving section of the user manual for more information about the Power saving feature.
NTP settings
This section is only available if Advanced mode is enabled.
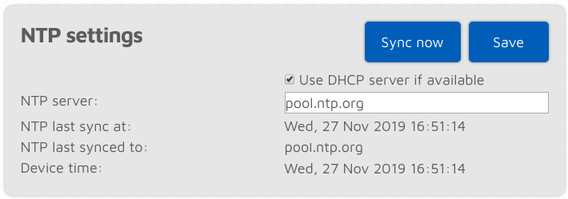
The openSPOT3 synchronizes date and time using the Network Time Protocol (NTP). By default, the NTP server advertised by the Wi-Fi network's DHCP server is used for synchronizing, but if the DHCP server does not advertise an NTP server, the host set at the NTP server setting will be used.
Note: The web interface loads the time from the openSPOT3 only when the web interface is opened. After that, the browser is updating the displayed clock and if the browser, or the web interface's browser tab is sent to the background then the time will be updated more irregularly due to the browser's CPU power saving mechanism. This causes the displayed openSPOT3 device time to be incorrect, but this does not affect the openSPOT3's clock, it will stay correct. Reload the web interface to make the displayed time accurate again.
Wireless settings
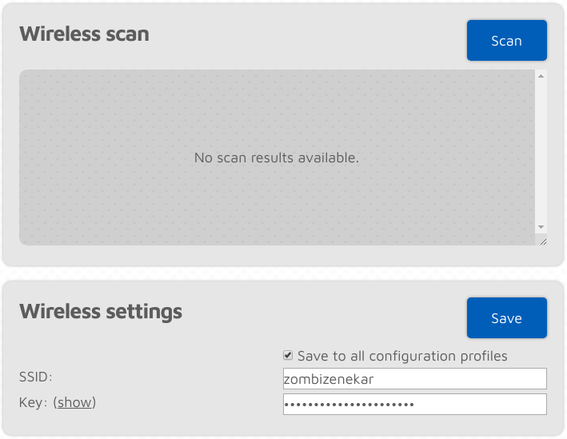
If Advanced mode is enabled, you can define up to 5 Wi-Fi networks (per configuration profile) to connect. If the first configured Wi-Fi network is not available, then the openSPOT3 will try connecting to the second one. If it's not available either, then it'll try the third one and so on. After trying connecting to all of the configured networks, it restarts the sequence with the first network.
If Advanced mode is enabled, the Wireless scan list will have a Save button for all previously unsaved networks instead of the Connect button. Clicking on the Save button lets you easily save the network to one of the 5 available Wi-Fi network slots.
If you are manually adding a connection to an iPhone's shared internet connection then make sure you copy and paste the phone's Wi-Fi SSID as the iPhone uses a special apostrophe character which looks nearly the same as the one you can enter with your keyboard, but it's different, and all characters need to match.
If the Save to all configuration profiles is active then the configured Wi-Fi networks will be saved to all profiles and will be common between profiles.
If no networks are configured then the openSPOT3 switches to access point (AP) mode and starts broadcasting its own Wi-Fi network. This is indicated by the status LED:

In this case, complete the steps described in the Initialization setup section of the user manual to set a Wi-Fi network for the openSPOT3.
The AP mode SSID can be set in the AP SSID input field. By default there's no Wi-Fi password set for the openSPOT3's AP mode, but you can set one at the AP key input field. The AP mode Wi-Fi channel can be set in the Channel number input field. If the Always start in AP mode checkbox is checked, then the openSPOT3 will always switch to AP mode after powered on even if there are configured Wi-Fi networks in the current configuration profile.
If a BSSID is configured for a network then it'll be used instead of the SSID. WEP encryption is also supported if the network key length is 5 or 13 characters.
IP settings
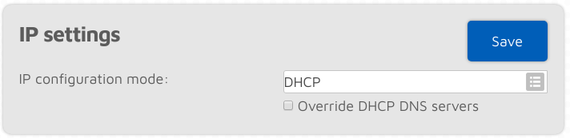
This section is only available if Advanced mode is enabled.
The openSPOT3 has two IP configuration modes:
- DHCP: This is the default mode. The device will use the Wi-Fi network's DHCP server for acquiring an IP address.
- Static: a static IP address can be set for the openSPOT3. This is only recommended for advanced users.
The DNS server settings which are advertised by the DHCP server can be overriden if the Override DHCP DNS servers checkbox is checked. If the openSPOT3 can't connect to a server (for ex. the openSPOT3 shows connector connecting after switching D-STAR® reflectors from your radio, but it can connect using the web interface otherwise), you can try overriding the DNS servers to 8.8.8.8 and 8.8.4.4.
MAC settings
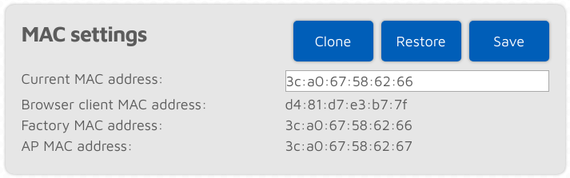
This section is only available if Advanced mode is enabled.
You can change/clone the Wi-Fi MAC address of the openSPOT3 here. This is useful if you try to use a Wi-Fi network which uses a captive portal for authentication (example: hotel or airport networks). In this case, do the following steps:
- Connect to the Wi-Fi network with your phone/tablet/computer, log in on the captive portal to enable the internet access for your phone/tablet/computer's MAC address.
- Switch the openSPOT3 to access point (AP) mode by holding the button for 3 seconds.
- Connect your phone/tablet/computer to the openSPOT3 AP, but exit the Initialization setup and open the Network page.
- Set the captive portal Wi-Fi network's SSID and key at the Wireless settings section.
- Click on the Clone button at the MAC settings section (make sure Advanced mode is enabled so the MAC settings section is visible).
- Switch the openSPOT3 back to normal mode by holding the button for 3 seconds, or by clicking the Switch wireless mode button at the top of the Network page. The openSPOT3 will connect to the captive portal Wi-Fi network with your phone/tablet/computer's already logged in MAC address.
Please keep in mind that MAC cloning may cause packet loss and the network connection of both devices may get periodically interrupted.