First steps
Charging the battery
Connect the openSPOT3 to a USB power supply to start charging the battery. The openSPOT3 is fully functional while it is charging.
Powering up
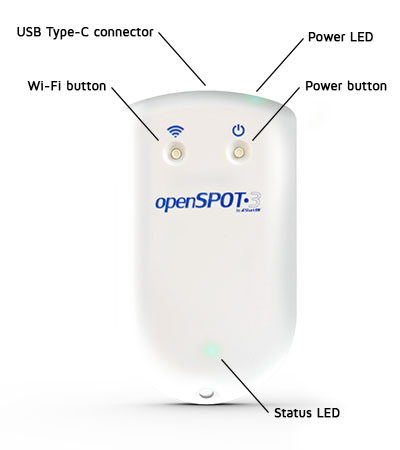
Power up the openSPOT3 by pressing the power button for at least 1 second.
If the device is running with the factory default configuration, then there's an initialization running for about 15-20 seconds and the status LED will be blinking white:

After this, the LED will be slowly flashing white indicating that the device has entered access point (AP) mode and it's broadcasting its own Wi-Fi network called openSPOT3 AP:

The AP mode is the openSPOT3's default mode of operation if no Wi-Fi networks are configured. AP mode lets you configure a Wi-Fi network which the openSPOT3 will connect in normal mode. You can switch between AP and normal mode anytime by pressing the Wi-Fi button for about 3 seconds.
Connecting the openSPOT3 to a Wi-Fi network
Connect your web browser device (phone/tablet/computer) to the Wi-Fi network called openSPOT3 AP.
If there is no Wi-Fi network called openSPOT3 AP, then make sure the openSPOT3 is in AP mode (status LED is flashing white). You can switch between AP and normal mode anytime by pressing the button for 3 seconds.
Also make sure the openSPOT3 is placed close to your phone/tablet/computer.
The initialization setup opens automatically.
If the initialization setup won't open automatically, then you can open it by entering http://192.168.99.1/ into the web browser while your browser device is connected to the Wi-Fi network openSPOT3 AP.
Select the country of operation, then click on the Next button.
Select which Wi-Fi network the openSPOT3 will use (usually your own Wi-Fi network) by clicking on the Connect button at the desired Wi-Fi network. Enter the Wi-Fi network password in the Network key dialog (make sure you enter the password case sensitive), then click on the dialog's Connect button.
The openSPOT3 stops broadcasting its own Wi-Fi network, and automatically tries to connect to the selected Wi-Fi network. This is indicated by the status LED becoming blue and then eventually alternating green/orange, or green.
The web browser device (ex. your phone) detects that the openSPOT3 AP is no longer available, and drops the connection. It should automatically connect back to the previously used Wi-Fi network. If it does not, connect it to the same Wi-Fi network as the openSPOT3.
A successful connection to the Wi-Fi network is indicated by an alternating green/orange (or green) status LED on the openSPOT3 which means the Null connector is active and the device is connected to the Wi-Fi network.

If the openSPOT3 can't connect to the configured Wi-Fi network (the status LED stays flashing blue), then it will automatically switch back to AP mode (indicated by flashing white LED) after 1 minute. If this happens, then restart the steps written above and verify that the Wi-Fi password is entered correctly.
Quick Setup initialization
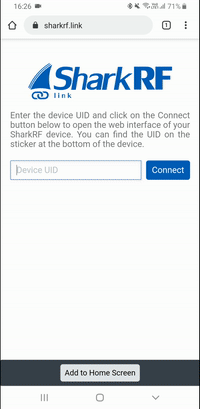
If the openSPOT3 is connected to the Wi-Fi network (indicated by green or green/orange) flashing LED, then open SharkRF Link in your web browser. Enter the openSPOT3's device UID (you can find this ID on the sticker at the bottom of the openSPOT3), then click on the Connect button.
The openSPOT3's web interface will open in your web browser. If not, then make sure your browser device (phone/tablet/computer) is connected to the exact same Wi-Fi network as the openSPOT3, and that the openSPOT3 is connected to the Wi-Fi network indicated be green/orange or green LED.
Fill in your callsign and IDs in the Quick setup, then click on the Save button.
Quick Setup
Quick Setup helps you to configure the openSPOT3 with your transceiver and connect to the preferred network.
- Select the type of your radio
- Set some basic settings like the frequency, and select the network you want to connect (this will set which connector will be used)
- Select the server to connect, set the needed network parameters (like your callsign, IDs, etc.), and click on the Connect button
- After the openSPOT3 is connected to the selected server it is ready to use with your transceiver