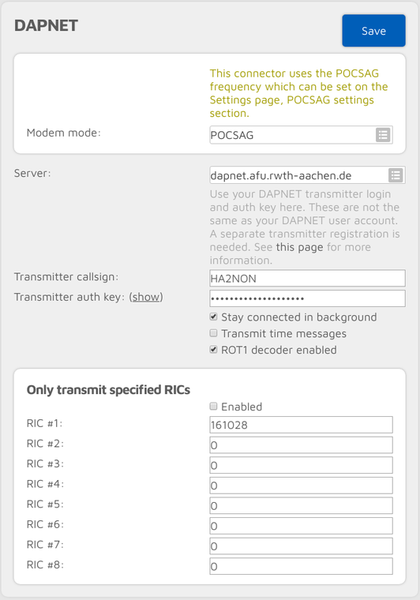
DAPNET connector

You can use this connector to connect to a network which supports the DAPNET protocol.
The easiest way is to use the Quick setup to connect to these servers.
This connector supports the POCSAG modem protocol which is the protocol used by pagers. You can find more information about POCSAG and DAPNET here.
The openSPOT3 acts as a transmitter on DAPNET, so make sure you use your DAPNET transmitter login and auth key for connecting the openSPOT3. These are not the same as your DAPNET user account. A separate transmitter registration is needed. See this page for more information.
This connector can stay active in the background if Stay connected in background is checked, which means you can use the openSPOT3 the same way as before with other active connector, but it will function also as a personal DAPNET/POCSAG transmitter. The openSPOT3 will automatically broadcast DAPNET/POCSAG messages when there's no call coming from the network or modem for POCSAG TX delay seconds (this can be set on the Settings page, POCSAG settings section), so ongoing calls won't be interrupted by POCSAG messaging. If the DAPNET connector is running in the background then you can see its connection status on the Status page.
If Transmit time messages is unchecked then the openSPOT3 won't transmit time messages from the DAPNET server. Some messages are ROT1 encoded, these will be automatically decoded if the ROT1 decoder is enabled. Note that not all ROT1 encoded messages can be recognized automatically so there can be received messages which won't be automatically decoded.
You can specify 8 RICs (IDs in POCSAG terminology) to filter messages to. If the Enabled checkbox is checked, then the openSPOT3 will only transmit POCSAG messages sent to these RICs by the DAPNET server.
DAPNET registration
You'll need 2 accounts to use DAPNET: one personal and one transmitter account. Here's how to create these accounts.
First, open a new ticket at support.hampager.de and select New DAPNET Account with RIC as the Help Topic. Fill in all required data and create the ticket. After this open a new ticket again and select New DAPNET Transmitter as the Help Topic. Fill in all required data and create the ticket.
You can set your callsign for both the personal and the transmitter account. For the transmitter registration, set the Transmitter Type to personal, and the Antenna Type to Omni. Transmitter output power is 0.02 for the openSPOT3. You can set the Antenna gain in dBi to 1 dB.